Oh My Zsh 在 Mac 安装和使用
🔗
本文系转载增补, 原文地址 : Mac-zsh 安装和使用(原创)
首先,我们知道,shell 有很多种:可以通过命令 cat /etc/shells 可以查看系统支持哪些 shell:
# List of acceptable shells for chpass(1).
# Ftpd will not allow users to connect who are not using
# one of these shells.
/bin/bash
/bin/csh
/bin/dash
/bin/ksh
/bin/sh
/bin/tcshZsh全称为 Z Shell,因为 Z 是最后一个字母,因此大家称之为——终极 Shell
查看当前启用的 shell 需要使用
$ echo "$SHELL"
/bin/zsh
安装
Linux/Unix 默认都是使用 Bash(Bourne-again Shell),使用 zsh,由于配置过于复杂,前期很少人使用,但后来有外国程序员弄出一个 Oh My ZSH 来管理 zsh 的配置和支持更多插件,使得 zsh 变得更容易使用和更加强大。
# curl
curl -L https://raw.github.com/robbyrussell/oh-my-zsh/master/tools/install.sh | sh

# wget
wget https://raw.github.com/robbyrussell/oh-my-zsh/master/tools/install.sh -O - | sh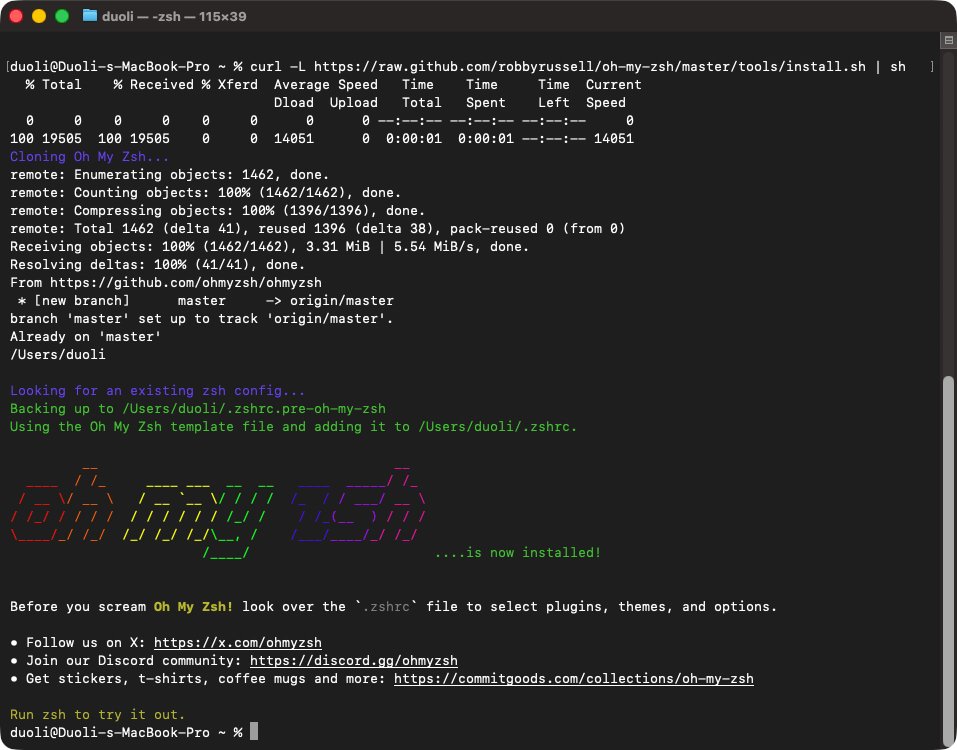
安装完之后,关闭当前终端,并重新打开一个,oh my zsh 的默认主题是 robbyrussel
安装完成之后退出当前会话重新打开一个终端窗口,你就可以见到这个彩色的提示
加载顺序解析
打开 Terminal
  -> 启动登录型 zsh
    -> 读取 /etc/zprofile            系统登录时读取的系统级配置
      -> 执行 /usr/libexec/path_helper -s
                                    根据 `/etc/paths` 和 `/etc/paths.d/*` 生成基础路径
    -> 读取 ~/.zprofile              用户登录级别配置, 适合存放登录环境初始化
      -> 执行 brew shellenv
    -> 读取 ~/.zshrc                 交互式配置,常放 `oh-my-zsh`、补全、主题、别名
      -> 加载 oh-my-zsh / nvm / alias / prompt
  -> 进入可交互命令行
配置
oh my zsh提供数十种主题,相关文件在 ~/.oh-my-zsh/themes 目录,可以编辑主题来满足自身需求,我是使用默认的robbyrussell
切换 theme
- Themes : 所有 Theme 预览
所有的主题都放在 ~/.oh-my-zsh/themes 目录中,先看一下有哪些可以用:
~/ [master*] ls ~/.oh-my-zsh/themes
3den.zsh-theme junkfood.zsh-theme
Soliah.zsh-theme kafeitu.zsh-theme
adben.zsh-theme kardan.zsh-theme
af-magic.zsh-theme kennethreitz.zsh-theme
...
daveverwer.zsh-theme nebirhos.zsh-theme
dieter.zsh-theme nicoulaj.zsh-theme
...切换方式是修改 .zshrc 的 ZSH_THEME 这个参数,预设是 robbyrussell,如果想改成 apple.zsh-theme,那么请把 ZSH_THEME 改为 apple:
# Set name of the theme to load.
# Look in ~/.oh-my-zsh/themes/
# Optionally, if you set this to "random", it'll load a random theme each
# time that oh-my-zsh is loaded.
ZSH_THEME="apple"
zsh 的改进方法
- 你可以打开
auto_pushd选项(通过命令setopt auto_pushd),这样你通过cd切换目录时,zsh会自动将前一个目录加到栈里,这样你就不会因为忘记pushd而遗憾了; bash里面可以cd -回到上一个目录(即最后一次调用cd时所在的目录),但 zsh 里面有cd -2,cd +3这样的用法,并且在输入cd -之后按TAB能够列出目录名供挑选补全。不过需要注意的是,这里2并不表示倒数第二次调用cd时的目录,而是倒数第二次通过pushd记录的目录,如果打开了auto_pushd选项,那么这两个的含义倒是一样的;zsh里面将~这个符号的用法进行了扩展,我们可以用hash -d www=/var/www/html定义一个路径别名,然后用cd ~www就可以进入到/var/www/html了
插件
oh my zsh 提供丰富的插件,存放在 ~/.oh-my-zsh/plugins 目录下:
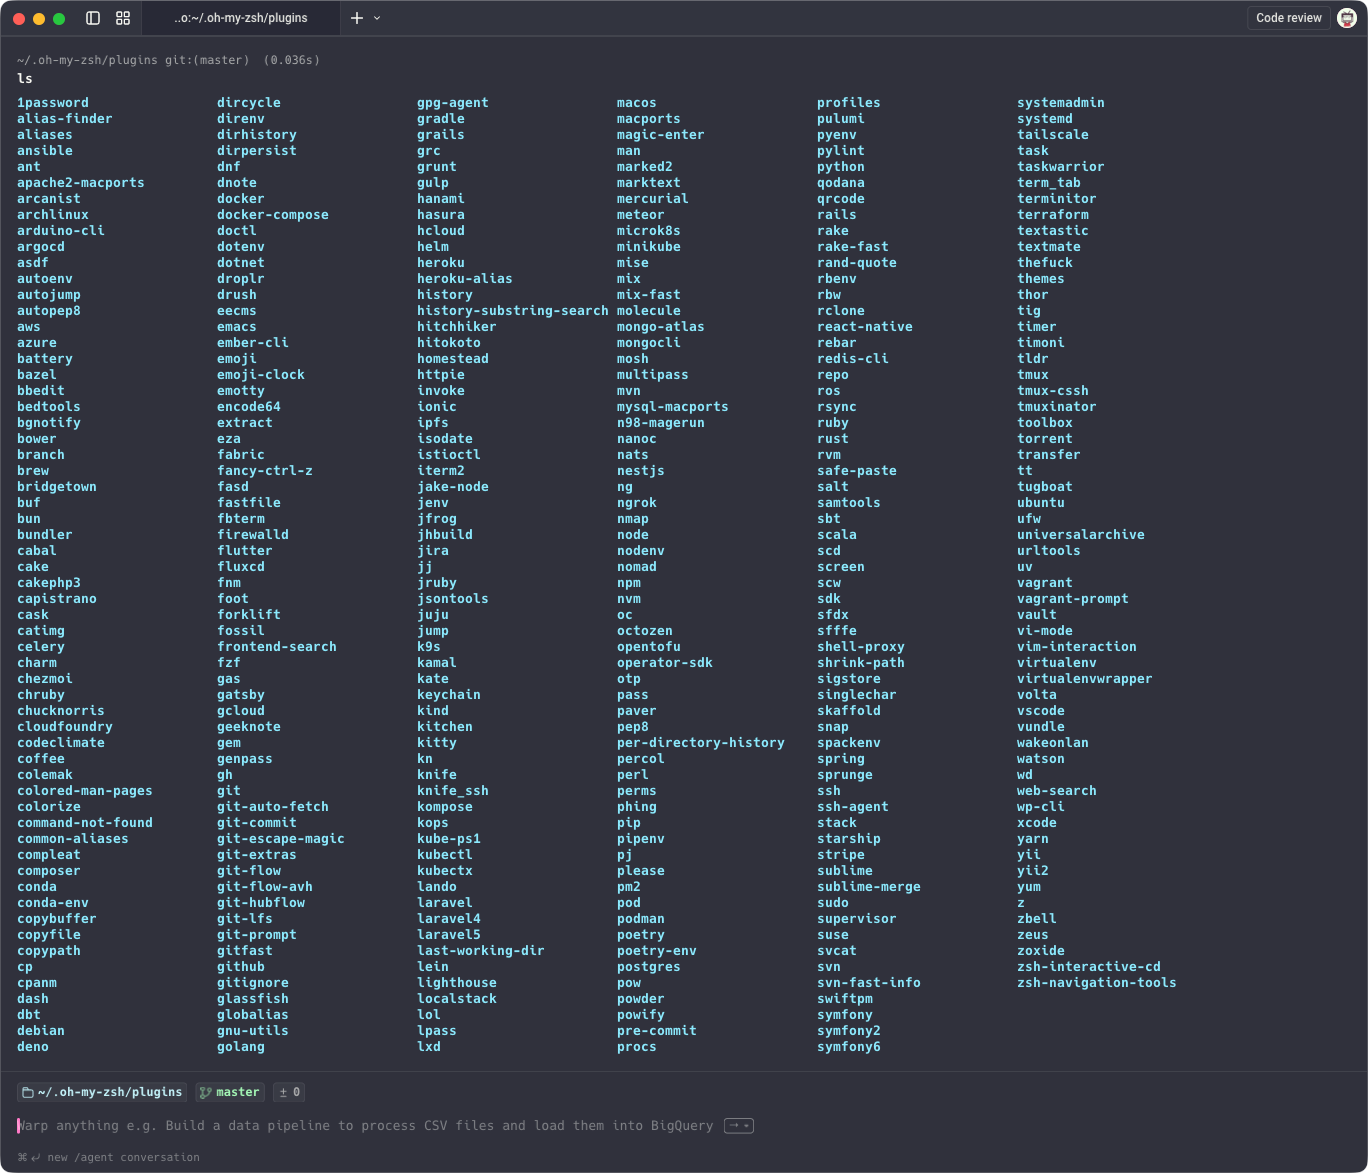
想了解每个插件的功能以及如何使用,只要打开相关插件的目录下 zsh 文件即可,以 brew 插件为例:
$ ~/.oh-my-zsh/plugins/brew
$ cat brew.plugin.zsh
显示如下:
# ...

if [[ -z "$HOMEBREW_PREFIX" ]]; then
  # Maintain compatibility with potential custom user profiles, where we had
  # previously relied on always sourcing shellenv. OMZ plugins should not rely
  # on this to be defined due to out of order processing.
  export HOMEBREW_PREFIX="$(brew --prefix)"
fi

...

alias ba='brew autoremove'
alias bcfg='brew config'
alias bci='brew info --cask'
alias bcin='brew install --cask'
alias bcl='brew list --cask'
alias bcn='brew cleanup'
alias bco='brew outdated --cask'
...
alias bubu='bubo && bup'
alias bubug='bubo && bugbc'
alias bugbc='brew upgrade --greedy && brew cleanup'
alias bup='brew upgrade'
alias buz='brew uninstall --zap'

function brews() {
  local formulae="$(brew leaves | xargs brew deps --installed --for-each)"
  local casks="$(brew list --cask 2>/dev/null)"

  local blue="$(tput setaf 4)"
  local bold="$(tput bold)"
  local off="$(tput sgr0)"

  echo "${blue}==>${off} ${bold}Formulae${off}"
  echo "${formulae}" | sed "s/^\(.*\):\(.*\)$/\1${blue}\2${off}/"
  echo "\n${blue}==>${off} ${bold}Casks${off}\n${casks}"
}
可以根据自己的需要来启用哪些插件,只需在 ~/.zshrc 配置文件追加内容即可:
plugins=(git autojump osx)常用命令
更新
$ omz update更新可能会需要外网访问
Updating Oh My Zsh
         __                                     __
  ____  / /_     ____ ___  __  __   ____  _____/ /_
 / __ \/ __ \   / __ `__ \/ / / /  /_  / / ___/ __ \
/ /_/ / / / /  / / / / / / /_/ /    / /_(__  ) / / /
\____/_/ /_/  /_/ /_/ /_/\__, /    /___/____/_/ /_/
                        /____/

Oh My Zsh is already at the latest version.

To keep up with the latest news and updates, follow us on Twitter: https://twitter.com/ohmyzsh
Want to get involved in the community? Join our Discord: https://discord.gg/ohmyzsh
Get your Oh My Zsh swag at: https://shop.planetargon.com/collections/oh-my-zsh
ZSH 插件列表
1. git
当您处在一个 git 受控的目录下时,Shell 明确显示 git 和 branch 信息,另外简化 git 很多命令,具体使用请参考: Plugin:git
2. autojump
autojump 是一个多端都通用的脚本, 可以进行智能跳转, 这里和 zsh 的对接的主要的方式就是是否要通过 zsh 来加载这个脚本, 使用的前提是 autojump 必须要进行安装, 详细的使用说明查看 autojump(1) / 文件系统快速导航工具
安装
$ brew install autojump插件激活
在 .zshrc 文件相应的位置,找到 plugins=() 这行,添加 autojump, 记得各插件名之间用英文空格隔开
# Example format: plugins=(rails git textmate ruby lighthouse)
# Add wisely, as too many plugins slow down shell startup.
plugins=(git autojump)
否则需要手动加入如下行到 .bashrc 中
[ -f /usr/local/etc/profile.d/autojump.sh ] && . /usr/local/etc/profile.d/autojump.sh利用 j –s 可以看你的历史路径库
$ j -s
10.0:        /Users/duoli/Documents/backup/duoli
...
10.0:        /var
3. osx
tab- 在一个新标签打开当前目录cdf- cd 到当前 Finder 目录quick-look- 快速浏览特殊的文件man-preview- 在 Preview 应用打开特定的 man pagetrash- 将特定的文件移到垃圾桶
使用:
1.各种补全:除了支持命令补全和文件补全之外,还支持命令参数补全,插件内容补全,只需要按 tab 键
2.目录浏览和跳转:输入 d,就显示在会话里访问的目录列表,输入列表前的序号,即可以跳转
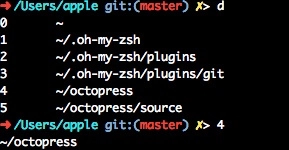
3.输入 .. 可以返回到上级目录

4. zsh-comopletions
安裝:
$ brew install zsh-completions

...
To activate these completions, add the following to your .zshrc:

  if type brew &>/dev/null; then
    FPATH=$(brew --prefix)/share/zsh-completions:$FPATH

    autoload -Uz compinit
    compinit
  fi

You may also need to force rebuild `zcompdump`:

  rm -f ~/.zcompdump; compinit

Additionally, if you receive "zsh compinit: insecure directories" warnings when attempting
to load these completions, you may need to run these commands:

  chmod go-w '/opt/homebrew/share'
  chmod -R go-w '/opt/homebrew/share/zsh'
...
要启用还需要打开你的 .zshrc 加入以下两行来加入 zsh-completions 的补全功能:
if type brew &>/dev/null; then
  FPATH=$(brew --prefix)/share/zsh-completions:$FPATH

  autoload -Uz compinit
  compinit
fi
同时还需要 rebuild zsh 的 .zcompdump
$ rm -f ~/.zcompdump; compinitFAQ
alias 别名
如果你本来就有在你的 .bashrc 中设定一些别名,又把这些设置直接用到.zshrc 中,那么有可能某些指令会变得不正常,这可能是因为你设定的别名与 oh-my-zsh 内置的别名冲突了。oh-my-zsh 内置的别名放在~/.oh-my-zsh/lib/aliases.zsh,内容如下:aliases.zsh
# Push and pop directories on directory stack
alias pu='pushd'
alias po='popd'
# Basic directory operations
alias ...='cd ../..'
alias -- -='cd -'
# Super user
alias _='sudo'
alias please='sudo'
#alias g='grep -in'
# Show history
if [ "$HIST_STAMPS" = "mm/dd/yyyy" ]
then
    alias history='fc -fl 1'
elif [ "$HIST_STAMPS" = "dd.mm.yyyy" ]
then
    alias history='fc -El 1'
elif [ "$HIST_STAMPS" = "yyyy-mm-dd" ]
then
    alias history='fc -il 1'
else
    alias history='fc -l 1'
fi
# List direcory contents
alias lsa='ls -lah'
alias l='ls -la'
alias ll='ls -l'
alias la='ls -lA'
alias sl=ls # often screw this up
alias afind='ack-grep -il'
建议要在 .zshrc 加上自己的 alias 前先确认看看这个文件中是不是有一些 alias 会跟你的冲突, 如果你启用了其他插件也会存在这个问题
把 ~/.zprofile 和 ~/.zshrc 分工清楚
很多人的终端配置越用越慢,本质不是插件太多,而是把「环境初始化」和「交互体验」混成了一锅粥
# ~/.zprofile
# 只放环境初始化,适合登录阶段执行
eval "$(`/opt/homebrew/bin/brew` shellenv)"
export PATH="$HOME/.local/bin:$PATH"

# ~/.zshrc
# 只放交互体验层,终端打开后才需要这些东西
export ZSH="$HOME/.oh-my-zsh"
plugins=(git)
source "$ZSH/oh-my-zsh.sh"

# nvm 这种既影响命令又带交互行为的东西,按团队习惯放置
export NVM_DIR="$HOME/.nvm"
[ -s "$NVM_DIR/nvm.sh" ] && . "$NVM_DIR/nvm.sh"
bash-completion
如果你跟我一样在使用bash时安装了 bash-completion,而且又没仔细弄清楚就把 .bashrc 的内容一般会套用在 .zshrc上,那么当你打开一个新的 shell 时有可能会发现遇到以下的信息:
.
  .
  .
/usr/local/etc/bash_completion:138: command not found: complete
/usr/local/etc/bash_completion:141: command not found: complete
/usr/local/etc/bash_completion:144: command not found: complete
/usr/local/etc/bash_completion:147: command not found: complete
/usr/local/etc/bash_completion:150: command not found: complete
/usr/local/etc/bash_completion:153: command not found: complete
/usr/local/etc/bash_completion:156: command not found: complete
/usr/local/etc/bash_completion:159: command not found: complete
/usr/local/etc/bash_completion:162: command not found: complete
/usr/local/etc/bash_completion:246: parse error near `]]'
这是因为在安装 bash-completion 的时候,原则上都会加入以下内容在你的 .bashrc
if [ -f $(brew --prefix)/etc/bash_completion ]; then
    . $(brew --prefix)/etc/bash_completion
fi
以上指令会去 source bash_completion 的内容,而 bash_completion 里面使用了 bash completion buitins 中的 complete 这个指令,所以如果你的 .zshrc 也去 source bash_completion,那就会 show 出像上面的 command not found: complete 这种信息了。所以记得在 .zshrc 中不要加入这段代码
Resource Reference
📆
更新记录 2026年03月13日
- 加入加载顺序解析, 合并 安装步骤